Showing posts with label Visible Image. Show all posts

Saturday, 27 April 2019

Three of Seven

Create your Imagination
is the title of the third card in this challenge.


I think I tried to do too much on this card
resulting in a bit of a clumsy mishmash.


The background circles are made using an embossing dauber with clear embossing powder.

The colour is 'spiced marmalade' and 'worn lipstick' Distress Oxides inks blended together, 
then the excess rubbed off the embossed bits with a tissue,
resulting in the white circles.

A couple of other background stamps were added,
followed by the little bunny who is all ready for winter showers.

Stamps
Brutus/Monroe - Be Unique
Visible Image - Mesh-ellaneous; Just Be Happy
49 and Market - Gabi's Line Stitch Stamp Set


As I said earlier, I think this card has too much going on,
however, it allowed me to have a play with some items which have been waiting
to be used for some time.

Stay tuned for card #4 in the Seven Cards in Seven Days challenge.

Happy Crafting!


Monday, 11 September 2017

Moth Season

Do you ever wake up feeling bleh for no reason?
This morning was one of those days, sigh!
Thankfully, things seem to have improved this afternoon, 
so I've just written instructions for an upcoming class later in September.

Meanwhile .....


..... I've been playing with Distress Oxide inks
which are heaps of FUN!!!

This is a blend of 'twisted citron' and 'spiced marmalade' ,
spritz a stencil lightly with water, and
hey presto, you have a cool and interesting background pattern.

Stamp with 'jet black' Archival Ink.
Cut the panel to size and adhere to a folded black card.
  
Stamps
Visible Image - "Glimmer of Light"

I'll be back again soon with more cards .....

Happy Crafting!


Friday, 25 August 2017

Doing something right

Woohoo!!!
I'm on a roll, or maybe just doing something right, but .....

I've been published again!!!

And not one, not two but 5 cards in total - WOW!!!

Drum roll .....


In Cardmaking, Stamping and Papercraft magazine [just picked up my copy today], is a special feature using Distress Oxide Inks.

These inks are so easy to use as they blend seamlessly and every result will be different.


Both these cards are made using the same technique, but different colours and stamps.

I was very happy with how they both turned out,
so if you are hestitant about using these inks, just go for it - they are brilliant!!!

Stamps
Visible Image (top card)
Lavinia Stamps (bottom card)


You can find these two cards in Vol 24 No. 1 - out now!

I'll be back later to show off the other three cards, so please come back!

Happy Crafting!


Thursday, 25 May 2017

May Showers

If you hadn't already worked it out, 
I enjoy playing along with challenges and swaps.
One of this month's swaps was entitled
"May Showers"
so after a bit of thought, this is what I came up with:


After a couple of false starts, which ended up in the recycling bin,
I decided to blend 'wilted violet' and 'worn lipstick' Distress Oxides together.
These inks blend seamlessly and are such fun to work with.

The next step is to take a stencil, lightly spritz with water
and lay it down on the blended card, mopping up excess water with paper towel.

I then stamped the image with 'jet black' Archival Ink, adding the puddles
and the sentiment.
I find stamping solid images difficult to get even coverage
and am beginning to think a Misti (or equivalent) would be very useful
for this type of stamp.


The last step in making this card, was to spritz the front with Perfect Pearls Mists in 'biscotti'.
Add a black mat for contrast and adhere to a white folded A5 card.

I hope my swap partner liked my "May Showers" card.
I was certainly happy with how it worked out,
especially after the first two attempts ended in the bin.

Stamps
Visible Image - Sparkle in the Rain


Happy Crafting!


Thursday, 4 May 2017

Create your imagination

Good morning, as I said yesterday,
I would be back today with another sample of a 
Fancy Fold Card.


For something easy, an Easel Card in its simplest form is just that - easy!
Two folds of the card base and you're done, 
then it's just a matter of measuring up for the topper and a mat
so that when the card is flat, it looks like a regular card.


Starting with the background, I decided to have a play with the new Distress Oxide inks.  These inks blend together beautifully and once spritzed with water, create some lovely mottled effects.
 
This was also the first time this horse stamp had been inked up, hence why he's not quite as black as I would have liked, but that's ok, I like him this way.
 
I added the script stamp across the bottom to ground him, 
as otherwise he was floating in the middle of the card.
 
I then stamped the sentiment on some white card, 
and coloured the inside of the letters with more of the same colour inks.
 
Stamps
Visible Image - Revolution
Visible Image - Just be Happy
 

I'll return tomorrow with my remaining sample of a fancy fold card.

Happy Crafting!
 

Sunday, 26 March 2017

My own little world

We awoke this morning to blue sky and sunshine,
quite a welcome change after March has been so wet.

So with a clear forecast, we decided as a family,
to play one last game of Putt Putt.
Sadly after 47 years, our local Putt Putt is closing down at the end of April
as developers move in and build even more highrise.
There is SO much building going on in Sydney with highrises
popping up everywhere - so much change happening!

Anyhow, the five of us plus one delightful girlfriend,
had a lovely afternoon hitting golfballs around the three courses.

Which of course, means no crafting happened today, 
so here is something that was made recently but didn't get blogged sooner.


Isn't he a cute little character?
Love the quote too!

I stamped him directly onto white card, coloured him with Prismacolor pencils,
with a piece of washi tape for him to stand on.

I edged around the white card and adhered it to a white card base.

Stamps
Visible Image - My own little world
PaperArtsy - Zinis ZN06

Happy Crafting!


Monday, 20 March 2017

Listen to your heart

On Friday morning I went off on a crafty play-date with a couple of friends.
Last minute packing consisted of some white cardstock, 
black inkpad and some stamps, suitable for some upcoming birthdays,
and my favourite colour pencils.


I started with this carefree spirit,
colouring her with various Prismacolor pencils.
The sentiment was stamped in 'jet black' Archival Ink.

This panel was adhered to some crinkly purple paper
which in turn was adhered to folded white card.

A matching 'happy birthday' sentiment was stamped on the inside.

A simple but, I think, pretty card.
Stamps
Paper Artsy Elenazinski Art - ZA03
Visible Image - Just be happy

Happy Crafting!


Tuesday, 14 March 2017

Glimmer of Light

As you may or may not know, 
I enjoy participating in a couple of international swaps.
 
Whenever I post my swap, I always like to include a card, 
partly as I think it helps protect the contents and partly because it's sort of an added bonus for the recipient.
Quite often, I leave the card blank and write my message on a post-it note, 
then if the recipient wants to use it for their own personal use, it's ready to go.


This is a card that accompanied an ATC recently.

It was the first time I'd used this stamp and I was quite happy with how it turned out.
The stamp is part of "Glimmer of Light" by Visible Image.
It was stamped in 'jet black' Archival Ink and coloured with Prismacolor pencils.
I edged around it with Distress Ink and layered it to a white card base.

I hope my swap partner liked it!

Happy Crafting!
 

Wednesday, 8 February 2017

Checkers

As I mentioned in the last post, it was a weekend of birthdays.

Following on from #2 son's birthday, was  
#1 son's birthday!


I started by stamping "Checkers" onto white card and fussy cut him.

I then coloured him with Kaisercraft pencils, 
mixing a couple of colours together on his shirt.

Next I chose a background paper from Kaisercraft 'Sandy Toes' collection
cutting it to leave a border on the black card.
I added some washi tape for "Checkers" to stand on,
 with a couple of torn snippets in the top corner for balance. 

Finally, I stamped "Life is a Journey" with 'jet black' Archival ink,
and popped "Checkers" onto dimensionals.


Stamps
Stampotique - Checkers
Visible Image - Just be Happy
 
As I mentioned before, a weekend of birthdays!

Happy Crafting!
 

Sunday, 5 February 2017

Birthday Weekend

It's that time again ...... what's that you say?

BIRTHDAY WEEKEND

Yes, today is #2 son's birthday, so out came some stamps I rather like,
but haven't used very much.


This muddled up zebra seems a little annoyed,
perhaps he was hoping his birthday would just float away like the balloons!
 Ha, ha ..... no chance!


I started with a shimmer black blank card 
(try saying that after a few drinks .... hic!)
 found a nice background paper from a dollar store and cut it down to fit.

I stamped the zebra and the balloons on white cardstock and fussy cut them.
Once I knew where he was going to sit, I stuck a piece of washi tape in place
and stamped the sentiment. 

I coloured the balloons and zebra with Prismacolor pencils.
One balloon was glued directly onto the background, 
the second balloon and zebra were popped onto dimensionals.
The balloon strings were drawn by hand.

Stamps
Katzelkraft - KTZ168
Visible Image - Just be Happy
Stampers Anonymous Tim Holtz - Crazy Things

Challenges
Sisterhood of Snarky Stampers - O is for Outrageous! 

After a yummy lunch out with the family, we returned home to open presents 
(and, of course, the card) 
followed by the 'kids' happily playing video games!

I'll be back again tomorrow for the second of the weekend birthdays!

Happy Crafting!


Saturday, 28 January 2017

My Own Little World

Today, since it has been quite hot again, 
I decided I'd stay inside in the air-conditioning and play.
Not for any reason except that I had new stamps sitting, patiently waiting on my desk
and today seemed like a good time to give them an inking.


This chappie is from Zinski Art (Set #03) and is available from Paper Artsy.
If you live in Australia, I bought mine from Time to Create.

The background is part of a double page spread in my Dylusions journal which was made a couple of years ago.  The left page was decorated at the time the background was done, however the right page was left as I never quite knew what to put on it.  

Today I knew what to do with it!


I wonder what this chappie's name might be?  
Hmmm ...... anyhoo, I coloured him with a combination of Inktense pencils
and Silks Acrylic Glaze and fussy cut him.  I also stamped him directly on the journal page to pick up the extra lines that are outside the main image.  The cut image was glued directly over the top.  From the same set I also stamped the small border for him to stand on.
A few stars, also from the set, were scattered over the background.


The quote is also a new stamp I recently acquired from Visible Image.  

Thanks for looking and if you feel so inclined, please leave a message!

Stamps
Paper Artsy 'Zinsky Art' - ZA03
Visible Image - My Own Little World

 Happy Crafting!

Tuesday, 12 July 2016

Wedding #1

I was recently asked by my BFF if I could make a couple of wedding cards for her.  Of course, I said "yes" and so I got playing over the weekend.


Without a particular colour specified, I decided to go with classic gold as I don't think you can go too far wrong with either gold or silver for a wedding.


I inked up the stamp using Versamark and embossed it with fine gold embossing powder.
A gold mat was laid under the white and some gold thread was wrapped around both layers which was finished off with a simple knot.

The sentiment was stamped and embossed in the same manner as above.

The insert also had words embossed in gold
[but silly me forgot to take a photo of the inside]. 


As an extra bonus, I added a little gift tag, also gold embossed and with a piece of gold thread attached.

Stamps
Visible Image - heart INKognito
Stampin' Up! - Heard from the Heart
Carabelle Studio - Love

I'll be back again tomorrow with the second card.

Happy Crafting!

Thursday, 18 February 2016

Believe in Magic

I really enjoy playing along with different challenges, so this time I'm joining in with 
where the theme is 'One Layer - include a stem'


I inked up the words with 'Jet Black' Archival Ink and with a mask in place and using 'peeled paint' Distress Ink, stamped the grass stems.  In keeping with the words, this little fairy is inked with 'Watering Can' Archival Ink.  To finish I used a light inking of 'peeled paint' around all the edges.

Visible Image - Large Tall Grass
Prima Clear Stamps - Butterfly
Katzelkraft - Magic

Happy Crafting!

Tuesday, 19 January 2016

Ready to Abandon

I thought I would have a bit of a play with some new stamps, so what better way to 'break them in' then to make some bookmarks to abandon.


I've used "There are always flowers" from Carabelle Studio for this first set of bookmarks.  
They are coloured with Prismacolor pencils and although you can't see it in the photo, there is a touch of Wink of Stella in the centre of each flower.


This lovely horse is from "revolution" from Visible Image, along with the script.  The words are from Katzelkraft.  The background colours are a blend of Distress Inks spritzed with water.


This great guy is "Buru" from Stampotique.  I stamped him directly onto the bookmark, then masked him and blended Distress Inks over the top.  He is coloured using a variety of Prismacolor pencils. These bookmarks are also spritzed with water.

All these bookmarks are now in plastic bags and ready to abandon.

Happy Crafting!

Monday, 17 August 2015

The One

A couple of weeks ago, I found I was a lucky recipient of a couple of freebies from Visible Image, a UK based stamp company.  So after doing a happy dance they arrived at the end of last week, just in the nick of time for an engagement card that was needed for Saturday afternoon.  I couldn't have asked for better timing!   

heart INKognito

I stamped the heart image with VersaMark and heat set fine gold embossing powder.  The words are from SU "Heard from the Heart", one of my favourite go-to sets of sentiments.  I used some gold card for a mat and mounted them onto white cardstock.

the one

The inside sentiment was stamped in 'jet black' Archival Ink.

I was very happy that the card came together quite quickly, was easy to make and looked great.


A BIG thank you to Visible Image for the gorgeous stamps!!!

Happy crafting!
  

Sunday, 8 March 2015

New beginnings

This week's theme on the 
Tagalong Challenge is "Spring"

Now I realise that for many people who have endured a very white winter this year, they would be very excited to see the first tell-tale signs of spring in their gardens.

However, on the other side of this beautiful world in which we live,
we are heading into autumn, and for me the thought of some cooler temperatures and lower humidity is something I'm looking forward to.  I used to love summer as a child/teenager, but as I'm getting older (shhhhh ...... we won't talk about this), I'm finding the humidity, more so than the actual temperature, is really starting to sap my energy levels.

Anyhow, back to the subject in hand, this is my tag for the challenge:


I started with my background using blue and green Gelatos, spritzing with water and brushing the colours around to where I wanted them.  

The first time I used Gelatos, I was so UNIMPRESSED and disappointed.  I followed instructions, watched youtube videos and still they just didn't work for me.    Fast forward 12 months and I decided to have another try with them in my art journal, this time adding lots more water, with a much better result.  And so, this tag was made using them ...... just goes to show that sometimes you need to revisit products/items in your stash!
 
I stamped the flowers, bird and mushrooms onto post-it notes so I could work out what had to go behind what.  I also stamped a second time onto white cardstock and fussy cut out mushrooms, the bird body and the flower heads.  The bird's body is popped onto dimensionals.  
The stamps used are :

"How does your garden grow?" ~ Dylusions
"Clearly doodle parts" ~ Dylusions
"Large Tall Grass" ~ Visible Image

I used water colour pencils for each of the images, adding sparkle to the flowers with my clear Wink of Stella pen, and Liquid Pearls to give the mushroom spots more dimension.

I doodled around the edges, added a piece of ribbon holding it in place with a co-ordinating brad.  I thought 'new beginnings' suited the spring theme.

Happy Crafting!
 

Sunday, 18 January 2015

Believe

I had a lovely day yesterday at the first Craftanoon of the year, which is held at a community centre in Caringbah.  Twelve hours of crafting from 10am - 10pm!!!  Well, not quite .... I got there a little late and we left to come home around 9pm.  By the time we have dinner (take-away pizza) I've run out of puff and am more than happy to pack up and head off.

So, what to take?  I try to make a list and take only what I need, although sometimes I realise I should have packed "X" and just have to make do.  Yesterday, I knew I had to make some ATCs for a swap that is due to be posted by tomorrow!  I'm good at waiting 'til the last minute to make deadlines!  I won't show you these until I know the recipients have received them, otherwise it spoils the surprise!

So, what did I make?


I thought I would make a tag using one of my new stamps from Visible Image
"Tala Catching Dreams Set".  

I started by cutting a tag from Coulture Creations "Plaid & Music" and distressed around the edges.  I then sponged around the edges with 'pumice stone' Distress Ink.  I inked up the word 'believe' in 'peeled paint' Distress Ink and stamped it in the bottom corner.  I also inked up the symbol in 'vintage photo' Distress Ink, stamping it off once for a faded look.  The postage image you can see was part of the 'Plaid & Music" paper.  For a little more background, I stamped a bit of splatter (SU "French Foliage") using both green and blue inks.

Next I cut another tag from ivory cardstock and coloured around the edges with 'peeled paint' Distress Ink. I then spritzed it with water to age it.

I stamped Tala onto white cardstock, fussy cut her and coloured her with watercolour pencils.   A paper tab was stapled onto the bottom tag before attaching the top tag at an angle and Tala was popped onto dimensionals.

This tag is also my entry in the following challenges:

Tagalong - postcards/letters
Craft Stamper - take a stamp

Thanks for coming to look.  I'll be back again soon with a couple of other things that were made at yesterday's Craftanoon.

Happy Crafting!!!

Saturday, 13 December 2014

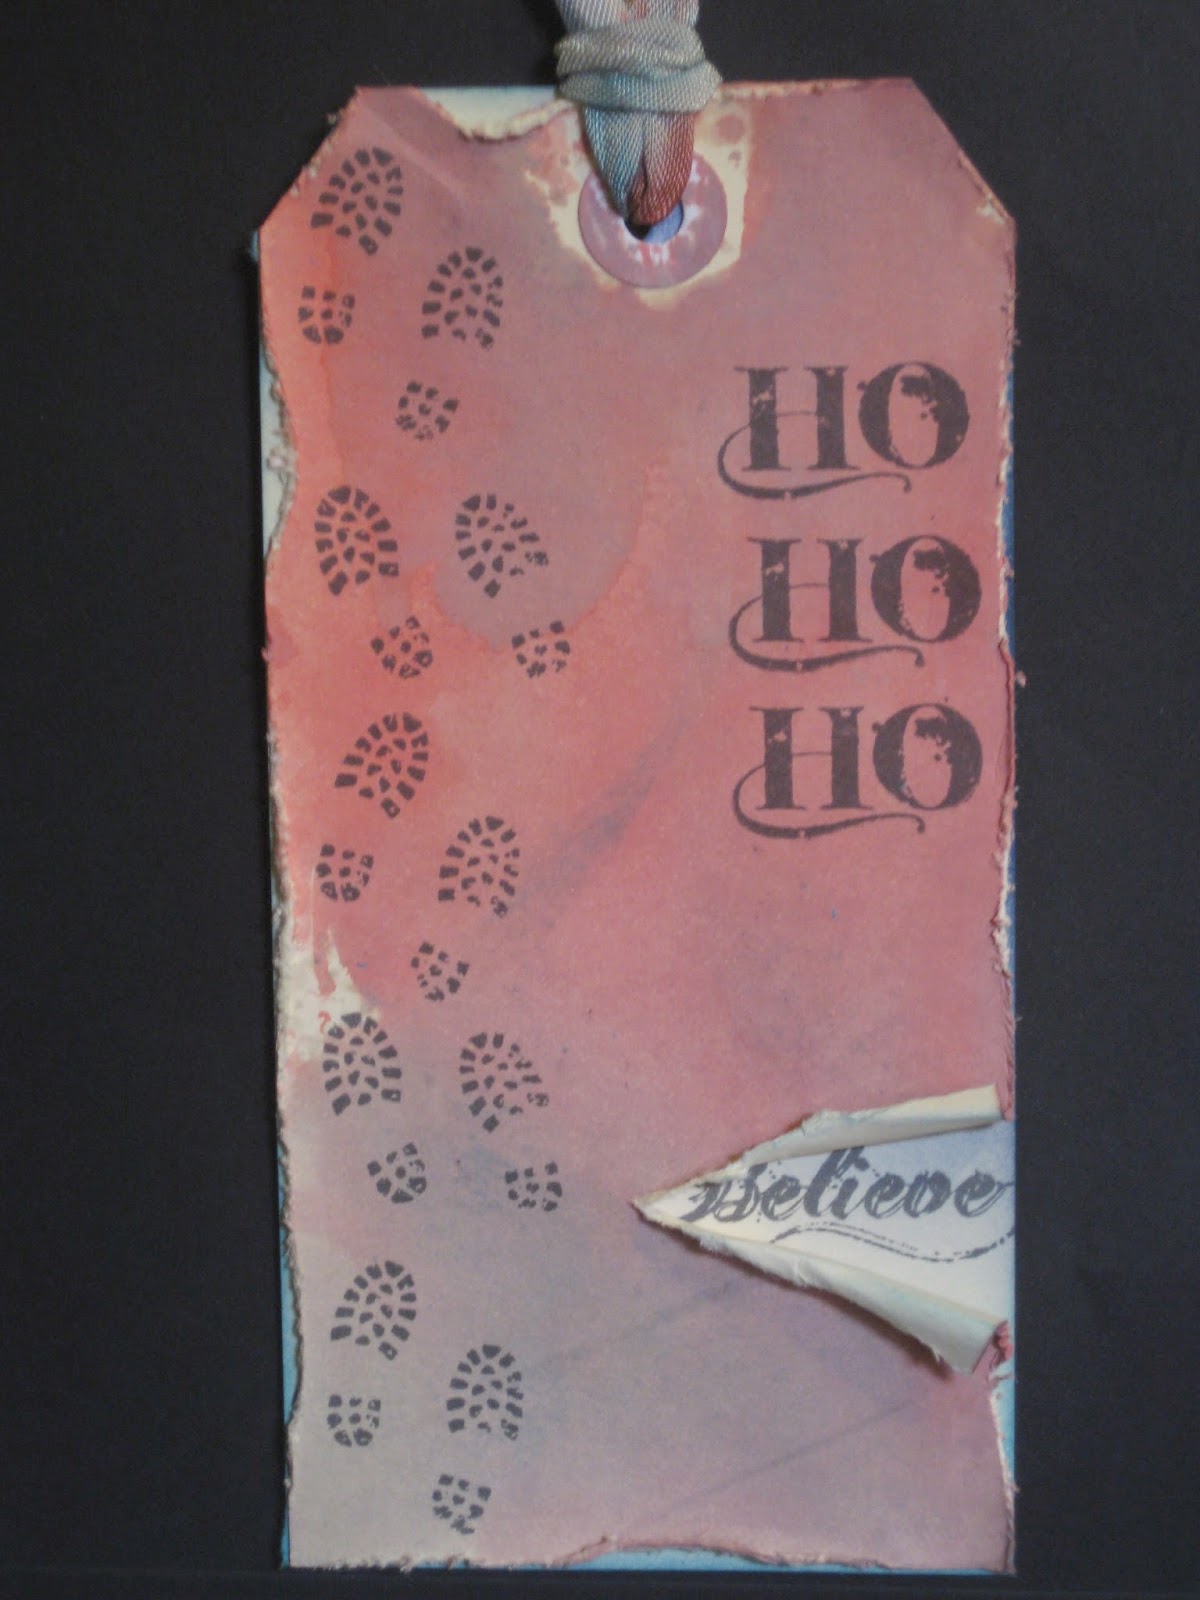
Visible Image - Ho Ho Ho

I thought I'd play along with a challenge that
has running at the moment.
Each month Craft Stamper magazine includes a little stamp on the front of the magazine and the December issue was a set from Visible Image of "HO" , "Believe" and some "footprints".

This is my entry tag in the challenge.


I thought I'd go with a vintage look to my tag using 'barn door' and 'iced spruce' Distress Inks which when blended together, give a grungy, vintage look to the tag.

The stamps were inked up using Archival 'watering can' ink which is much better suited to the vintage look, then if I had used jet black.

I went around the edges with my distressing tool, tearing and rolling a section in which the word "believe" peeps through from below.


I adhered this tag to another of the same size which has just a touch of 'chipped sapphire' Distress Ink around the edges.  
The seam binding ribbon was dragged through 'barn door' and 'chipped sapphire' inks and spritzed with water to blend the colours together.  It was then looped through the tag.

Hope you like my tag using these cover stamps.

Happy Crafting!!!